Introduction:
Discover the Magic of Mac Screen Recording with Audio
Welcome to the world of Mac screen recording with audio! In this guide, we’ll show you how to screen record on Mac with audio like a pro. You’ll learn the secret recipe to create videos that not only capture what’s on your screen but also include clear and crisp audio to make your content shine.
Hear it All: The Power of Sound in Screen Recordings
Ever wondered how to add that extra magic to your videos? It’s all about the power of sound! We’ll teach you how to use audio in your screen recordings on Mac. From adding your voice to using background music, you’ll discover how to bring your content to life and keep your viewers hooked.
Breaking Free from Mac’s Soundless Shackles
If you’ve ever been frustrated by the lack of audio in your Mac screen recordings, worry no more! We’ll help you break free from those soundless shackles. With our simple instructions, you’ll learn how to record your Mac screen with sound and unlock a whole new level of creativity.
Elevate Your Content: Become a Screen Recording Pro
Ready to take your content to new heights? Learning how to screen record on Mac with audio is the key to becoming a pro. By mastering this skill, you’ll be able to create engaging and informative videos that impress your audience and set you apart from the rest.
Embark on an Audio-Visual Adventure
Get ready for an exciting adventure in the world of audio-visual content! Together, we’ll embark on a journey to discover how to record your Mac screen with audio. No technical jargon – just simple and effective tips that will make your screen recordings pop with professionalism and creativity. Let’s begin this thrilling audio-visual journey together!
How to screen record on Mac with audio with Ease: A Quick Guide Using Keyboard Shortcuts
Looking to capture your Mac screen swiftly? Good news! Your Mac has a built-in screen recording tool waiting for you. If you’re using macOS Mojave (10.14) or a newer version, this feature is already at your fingertips. Let’s dive in and learn how to screen record using a simple keyboard shortcut:
Step 1. Get Ready to Capture:
Press “Command + Shift + 5” to open the screenshot toolbar. This handy shortcut will prepare your screen recording tool for action.

Step 2. Frame Your Focus:
Decide on your recording scope – whether it’s the entire screen or a specific portion. The choice is yours! Embrace the “Record Entire Screen” button for a full-on view, or opt for the “Record Selected Portion” option to focus on the essentials. Drag your cursor to mark your recording territory if you choose the latter.
Step 3. Roll Camera, Action!:
Ready to roll? Hit the “Record” button”, and your Mac will spring into action, capturing the magic on your screen. From important demos to hilarious reactions, every moment is now within your grasp.
Step 4. Your Director’s Cut:
When you’re ready to wrap up, simply click the “Stop” button in the menu bar. Your Mac will obediently conclude the recording, leaving you with a masterpiece in the making. Save, share, and savor those memorable moments with the world!
Embrace the art of Mac screen recording, and let your creativity flow! From dazzling tutorials to epic gaming victories, the possibilities are endless. Unleash your recording prowess and create content that wows your audience and inspires your inner artist. Get ready to seize the moment and become the director of your digital story!

Step 5. Unveil Your Creation:
The moment of truth has arrived! Navigate to your desktop, and there it is – your screen recording, proudly displayed for you to relish. Take a moment to admire your work, for you have now mastered the art of Mac screen recording.
Congratulations! Your screen recording adventure has led you to this point of triumph. With newfound skills, you can share your creativity, knowledge, and fun-filled moments with the world. Keep exploring and recording, as each new endeavor brings new opportunities to captivate your audience and leave a lasting impression. Happy screen recording!
Ready to supercharge your screen recording prowess? Discover a treasure trove of advanced options that will take your recordings to the next level. Here’s how you can customize and enhance your screen captures like a true pro:
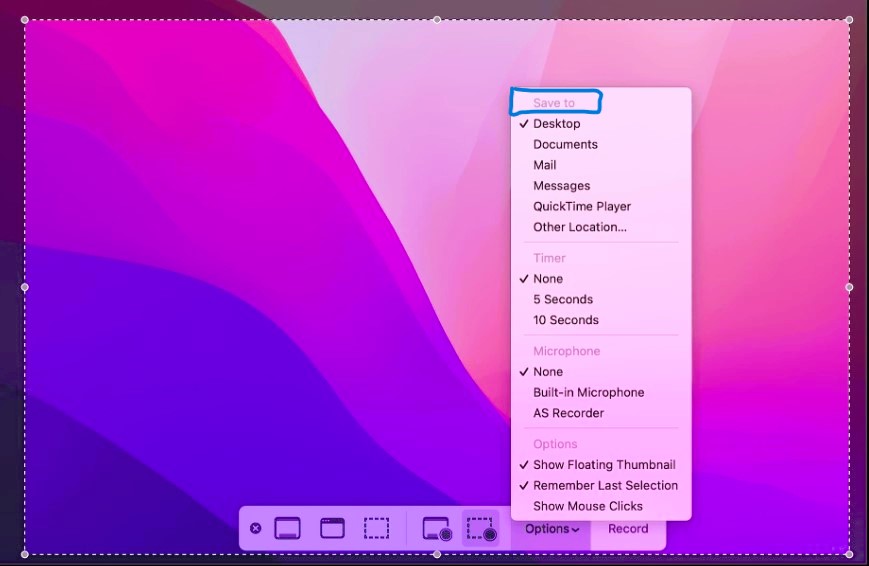
Revamp Save Locations:
Tired of recordings cluttering your desktop? Take charge and change the save location to a folder of your choice. Simply head to “Options” > “Save to” and pick your preferred destination for organized and accessible recordings.
Time Your Recording to Perfection:
Stay in control with the timer feature! Whether you need precise recordings or to manage your time efficiently, set a timer by going to “Options” > “Timer.” Your recordings will begin and end automatically, keeping you focused on what matters most.
Enrich with Microphone Audio:
Make your recordings come alive with crystal-clear audio. Capture your voice, narrations, or reactions by selecting the appropriate option in the toolbar. Your viewers will be engaged and immersed in every detail of your content.
Highlight Clicks for Clarity:
Want to guide your audience through each step? Enhance your tutorials by showcasing mouse clicks in your recordings. A simple selection in the toolbar will help you create clear and easy-to-follow instructional content.
Create Custom Shortcuts:
Personalize your recording experience by customizing keyboard shortcuts. Navigate to “Options” > “Customize Controls” and tailor the shortcuts to match your workflow. Streamline your process and become a recording virtuoso in no time.
Note: While this method excels at capturing your Mac screen, it doesn’t record internal audio. For full-fledged screen recordings with audio, consider using an audio routing tool or a third-party screen recorder designed specifically for Mac.
Embrace these advanced options, and the possibilities for your screen recordings will be limitless. With creative control at your fingertips, your content will captivate, educate, and entertain your audience like never before. So, level up your screen recording game and let your creativity soar!
Discover the Hidden Gem: how to screen record on Mac with audio with QuickTime Player
Did you know that your Mac comes with a secret screen recording tool called QuickTime Player? This nifty application allows you to record your screen, microphone audio, webcam, or a combination of these. While it doesn’t capture system audio, it’s still a fantastic built-in option. Let’s dive into the steps to screen record on Mac using QuickTime Player:
Step 1. Unveil QuickTime Player:
Locate QuickTime Player on your Mac either by searching in Spotlight or finding it in the Applications folder. Once you’ve found it, open it up to embark on your screen recording journey.
Step 2. Begin Recording:
Head to the File menu and select “New Screen Recording.” QuickTime Player will set the stage for your screen recording adventure.
Step 3. Launch Your Recording:
A small and handy screen recording window will pop up. Look for the red “Record” button and give it a satisfying click. Your screen recording will begin instantly, capturing all the action on your Mac.
Step 4. Wrap Up Your Recording:
When you’re ready to conclude your screen recording, click on the “Stop” button in the same window. QuickTime Player will gracefully put an end to your recording, leaving you with a perfect capture of your Mac screen.
Step 5. Preserve Your Creation:
With your recording complete, it’s time to save your video masterpiece. Choose your desired location, and QuickTime Player will preserve your screen recording for you to share and cherish.
Congratulations! You’ve mastered the art of screen recording with QuickTime Player. Whether it’s tutorials, presentations, or just capturing memorable moments, this simple yet powerful tool is your key to creating engaging and informative content. Happy recording!
FAQ:
Which is the best screen recording software for Mac?
Are you on the hunt for the best screen recording software for your Mac? Look no further! We’ve handpicked these top-notch options that cater to all your needs:
1. Camtasia: The All-in-One Champ
Camtasia reigns supreme with its extensive features and user-friendly interface. It’s perfect for tutorials, presentations, and more. Experience unmatched recording with Camtasia!
2. Loom: Share Effortlessly Online
For seamless online sharing, Loom is the ideal choice. Capture your screen and instantly share with ease. Level up your collaboration game with Loom!
3. Movavi: Made for Mac Lovers
If Mac compatibility is your priority, look no further than Movavi. Enjoy a user-friendly interface and powerful tools for a delightful recording experience.
4. Nvidia ShadowPlay: A Gamer’s Dream
Attention, gamers! Nvidia ShadowPlay is tailored just for you. Capture your epic gaming moments in high-quality. Elevate your gameplay recordings with Nvidia!
5. OBS Studio: Free and Fantastic
For budget-conscious users, OBS Studio is the ultimate choice. It’s feature-packed and absolutely free. Dive into endless possibilities with OBS Studio!
Choose the software that aligns perfectly with your needs. Whether you’re a professional, a gamer, or a content enthusiast, these top screen recording tools will help you create captivating and high-quality recordings on your Mac. Happy recording!
How to Record Screen with Sound on Mac?
Yearning to add audio to your Mac’s screen recordings? We’ve got you covered! Follow these steps to seamlessly record both your screen and sound:
Step 1. Open QuickTime Player on your Mac.
Step 2. From the “File” menu in the menu bar, select “New Screen Recording”.
Step 3. Click the small arrow next to the red record button and choose “Built-in Microphone” or any other connected microphone.
Step 4. Engage the red record button to commence your screen recording with audio.
Step 5. To conclude, hit the Stop button in the menu bar or use the shortcut “Command + Control + Esc”.
Step 6. Save your screen recording, and voilà! The audio will be captured seamlessly with your video.
With these steps, you can now effortlessly elevate your screen recordings with accompanying audio on your Mac. Say goodbye to silent captures and hello to captivating content! Happy recording!
How and What are the options for editing screen recordings on Mac?
Want to refine your screen recordings on Mac? You’ve got options! Check out these ways to edit your videos and make them shine:
1. Adobe Premiere Pro: A pro-level video editing software with advanced tools. Import your screen recording footage, and craft a polished final product with precision.
2. QuickTime: Another pre-installed software on Macs. Open your screen recording in QuickTime, and effortlessly trim, split, and adjust the volume to fine-tune your video.
3. iMovie: It’s free and pre-installed on Macs. Import your screen recording, then use iMovie’s editing tools to trim, cut, add music, and apply effects to create captivating videos.
4. Final Cut Pro: A Mac-exclusive professional editing software with a user-friendly interface and powerful tools to make your videos stand out.
No matter which software you choose, the editing process remains simple. Trim away unwanted parts, add smooth transitions, and adjust color and audio settings to elevate your video’s quality.
So, unleash your creativity and bring out the best in your screen recordings with these editing options on Mac! Happy editing!
What are the ways to share my Mac screen recording with others?
Excited to share your Mac screen recording with others? Here’s how you can effortlessly do it:
AirDrop: For nearby sharing, use AirDrop. Open the screen recording in Finder, click Share, and select the person’s name from the AirDrop options to send it wirelessly.
Video-Sharing Platforms: Share your recording on YouTube, Vimeo, or Wistia by uploading it and sending the link to others.
Messaging Apps: Directly send the screen recording through iMessage, WhatsApp, or other messaging apps.
Cloud Storage: Upload the screen recording to Dropbox, Google Drive, or iCloud, and share the link with your desired recipient.
Email: Attach the screen recording to an email. Open it in Finder, right-click, select Share, and then choose Mail. Compose your email and hit send.
Choose the option that suits your preferences, and your screen recording will be effortlessly shared with those you want to impress or inform. Happy sharing!
Conclusion:
A. Recap the Essentials: Mastering Mac Screen Recording
Let’s rewind and recap the vital points covered in this blog post. From utilizing built-in options to exploring advanced software, you’ve learned how to record your Mac screen with audio like a pro!
B. Time to Shine: Start Recording with Confidence
Now that you’re armed with the knowledge, it’s time to unleash your creativity and start recording your Mac screen with sound. Embrace this skill and captivate your audience with engaging and informative content.
C. Share Your Success: Inspire Others to Record
We can’t wait to hear about your successful screen recording experiences! Share your stories, tips, and impressive recordings with others. Let’s inspire and elevate the community of Mac screen recorders together!
In conclusion, recording your Mac screen with audio has never been more accessible. With the right tools and passion, you’re on your way to creating compelling videos that leave a lasting impact. So, get out there and start recording like a true pro – the world is waiting to see what you’ll create!